ABX Tester
abx is a program for performing software-based audio ABX testing.
ABX test (Wikipedia, Hydrogenaudio) is a statistical method for
assessing whether you are able to tell for audible differences between
two samples. For example, one sample could be compressed audio, such
as Ogg Vorbis, and another one its uncompressed variant. You could
then use abx to infer whether you are able to separate the two
samples due to compression artifacts.
Test overview
During the test, one of the samples is called A and the another one is called B. You choose A and B. The program chooses X, which is either A or B, but you don’t know which one. Your task is to listen carefully to all samples (A, B, and X) and then decide whether X is A or B. By guessing, your chances for the correct answer are 50/50, or probability 1/2. After repeating the process for, say, 10 times (or trials) the probability of correctly guessing X at every trial is only 1/210 = 1/1024 ≈ 0.001. This is the p-value of this particular outcome: it is the probability of observing 10 correct answers under the assumption that you are not able to separate A from B (null hypothesis).
However, if you actually get 10 correct answers out of 10 trials, it means that either you were very lucky, or you seem to be very able to tell the difference between A and B. In statistical terms, based on the observed performance, there is strong evidence against the null hypothesis. Quantitatively, we have 100 * (1 - p-value) % = 100 * (1 - 0.001) % = 99.9 % confidence in your ability to tell the difference between A and B.
Requiring 99.9 % confidence sounds a bit extreme, although on some fields of science it is justified. Conventionally, 95 % confidence level is considered the minimum acceptable level for statistical significance. This confidence level is achieved if the p-value of a test outcome is less than or equal to 1 - 0.95 = 0.05. Returning to our previous example, this means that you don’t necessarily need to get 10 correct answers. In fact, 8 correct answers is enough to reach 95 % confidence level. This is because the probability of getting 8 or more correct answers by chance—which is the p-value of the test outcome with 8 correct answers—is
∑ i ∈ {8, 9, 10} Bpmf(i, 10, 0.5) = 0.054688 ≈ 0.05.
Here Bpmf(i, 10, 0.5) is the value of probability mass function of the binomial distribution B(10, 0.5) evaluated at i.
With abx you can perform as many trials as you want. Doing more
than 25 trials is not recommended, though, due to listening fatigue.
After all trials abx calculates the p-value of the test outcome.
Caveats
ABX testing does not give absolute truths about fidelity. Consider at least the following:
- Avoid multiple comparisons. By simply guessing you get a significant result on 95 % confidence level (p-value ≤ 0.05) with probability 0.05. If you repeat testing long enough you will eventually get a “significant result” purely by chance. In this case it will happen after 1 / 0.05 = 20 tests on average.
- When using samples from lossy compression codecs (MP3, AAC, Vorbis), codec performance depends on the source signal (speech is different from music, etc.).
- ABX tests only separation capability, not relative quality between samples.
- You are likely to get different results with different equipment.
Also remember that there are no absolute rules: when it
sounds good, it is good
.
Installation
Download and extract the source code: abx-0.2.tar.gz. You will need
the following libraries (and their corresponding dependencies, of
course) to compile abx:
- libsndfile for audio input
- PortAudio V19 for audio output
- GTK version 3 for the user interface (GTK versions 2 and 4 won’t work).
If you’re running GNU, your distribution might have separate
development packages named like libgtk-3-dev. You need to install
them first.
abx uses GNU Autoconf, so simple configure, make and make
install commands are usually enough to compile and install the
program. See the INSTALL file for generic installation
instructions.
User interface
Usage synopsis:
abx [OPTION...] [SAMPLE_A SAMPLE_B]
Specify two sample file names, SAMPLE_A and SAMPLE_B, if you want
to initialize a new test from the command line. The samples can be in
any file format that libsndfile can read (see table). abx will
display a warning if the samples have more that 10 ms difference in
their duration, because large differences can easily compromise the
test.
Please note that libsndfile does not support most lossy file formats
like WMA or AAC. You cannot specify such files as arguments to abx;
you have to convert them into a compatible format first. Most media
players and utilities can do such conversions. For example, to
compare sample.m4a and sample.flac, you could do something like
this (using FFmpeg to convert MPEG-4 audio to WAV):
ffmpeg -i sample.m4a m4a.wav
abx m4a.wav sample.flac
Recent libsndfile versions do support lossy Ogg Vorbis, Opus, and MP3
file formats, and also lossless but compressed FLAC format. These
files can be used as is, albeit with some caution. The potential
problem here is that file access and decompression may introduce
noticeable latency when abx is starting to play back a sample. This
latency, while variable, may be systematic enough to give subtle hints
for the listener on which sample is being played as X, thus biasing
the result and invalidating the test. Unfortunately, abx cannot do
much to reliably detect and prevent this from happening. When in
doubt, stick to an uncompressed format like WAV, and preferably use
the same format for both samples.
Command line options
The available command line options are:
-i,--num-trials=N: Do N trials. You can use this to override the upper limit in the GUI, if you want.-d,--audio-device=ID: Use PortAudio audio device with id number ID. By default,abxscans for the default audio output device and uses it. If scanning does not work, or if you want to use some other device (e.g., another sound card), specify the device id here. See also-D.-D,--list-devices: Enumerate all output devices known to PortAudio and exit. Default latencies and the system default output are listed as well. You can use this option to find a device id to use with the-doption.-l,--latency=L: Set the suggested PortAudio output latency to L milliseconds instead of the default device-specific latency (see-Doption). Try to increase latency if you have sound playback issues, like clicking or stuttering.- Common GTK options, use
--helpto display them.
Main window
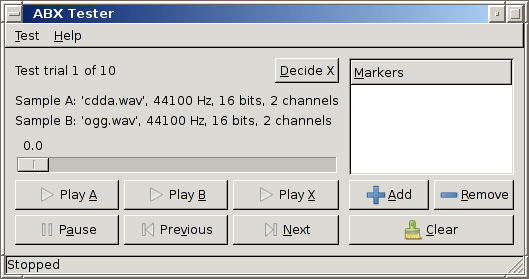
The main window shows some basic information about the current test or “(no test in progress)” if there is no current test. You can initialize a new test from the Test menu.
After a test has been initialized, you can listen to samples A, B and X using the play and pause buttons. The time slider shows the current playback location, and it lets you to quickly forward or rewind to any location. Markers are a special feature: a marker is simply a saved playback location, where you easily skip to by double clicking on it. When a marker is selected in the marker list, the playback buttons start playback from that marker location. A marker can be deselected by clicking on it while pressing a Control key, or by moving the time slider. You can add the current location into the marker list by clicking on the “+” button. Markers are useful: if you hear audible differences at some particular location, you can save that location into the marker list and fast-forward to it in later trials.
After listening to all samples and making up your mind about X, click on the Decide button. Choose your answer from the dialog box. Then you can proceed to the next trial or, if all trials have been decided, the test results will be shown.
The following shortcut keys are available in the main window:
| Key(s) | Function |
|---|---|
| A, Alt-A | Play sample A. |
| B, Alt-B | Play sample B. |
| X, Alt-X | Play sample X. |
| Space, Alt-P | Pause or resume playback. |
| N, Alt-N | Select the next marker. |
| P, Alt-R | Select the previous marker. |
| + | Add a new marker from the current location. |
| − | Remove the selected marker. |
| Left | Seek backward one second. |
| Ctrl + Left, Page Up | Seek backward 10 seconds. |
| Right | Seek forward one second. |
| Ctrl + Right, Page Down | Seek forward 10 seconds. |
Results window
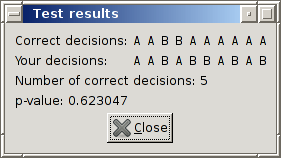
In the results window you will see the correct answers (decisions) on top of your answers. The leftmost letter corresponds to the first trial, the next one to the second trial, and so on. In the above screen shot there have been 10 trials with 6 correct decisions. The corresponding p-value is 0.377.
New test window
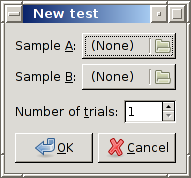
This is a simple dialog for setting up a new test. Use the file selectors to choose two sample files, and enter the desired number of trials. As described in the usage synopsis above, you can choose any sample files that libsndfile can read.
Copyrights
Copyright 2010, 2016, 2024, 2025 Petteri Hintsanen
This program is free software: you can redistribute it and/or modify it under the terms of the GNU General Public License as published by the Free Software Foundation, either version 3 of the License, or (at your option) any later version.
This program is distributed in the hope that it will be useful, but WITHOUT ANY WARRANTY; without even the implied warranty of MERCHANTABILITY or FITNESS FOR A PARTICULAR PURPOSE. See the GNU General Public License for more details.
Last updated on 24 August 2025.